Create grooves with Sweep command on cylindrical side
The cylindrical shape explains how to create a groove through which the cam passes.
The groove is created vertically towards the center of the cylinder.
Procedures
[1] Create guidelines wrapped in cylindrical shapes.
[2] Create a cross-sectional shape of the groove.
[3] andClick the Feature tab → Sweep Cut.
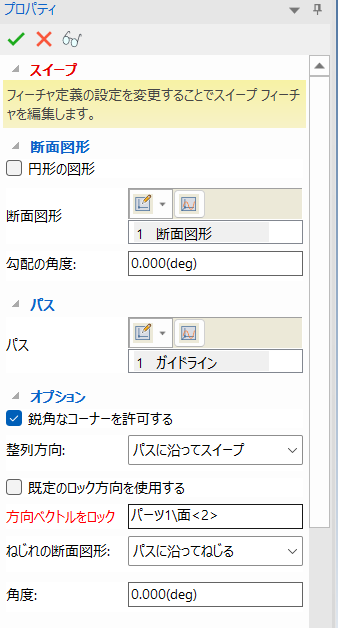
Select the shape created in [1] and [2] and set the properties.
[5] The ditch is created OK.

If you see an error, change the modeling kernel to Parasolid to check.
Please refer to the following video for details.
Ic-124
Related Articles
Creating Grooves on a Cylindrical Surface Using Wrap Emboss
This section explains how to create evenly spaced radial grooves on the side surface of a cylindrical shape. Procedure: [1] Check the circumference length of the cylinder. [2] Go to the [Sketch] tab and create sketch line that match the circumference ...Creat a Helical Groove on a Cylinder
This section explains how to create a helical groove on the side of a cylinder using the [Helix] option under 3D Curve. The helical groove is created using a combination of the [Helix] command from 3D Curve and the [Sweep] command. Procedure: [1] ...Create movements along the cam with followers/cam restraint
Explain how to create animations where followers work along the rotation cam. Procedures [1] Click [Positioning Constraints] from [Positioning] group on the [Tools] tab. Then select [Followers/Cam] command. Be sure to create any cam-shape with a ...Drilling Holes in the Side of a Cylinder
This section explains how to create holes in the side surface of a cylinderical solid shape. Procedure: [1] From the [Shapes] catalog, drag and drop [Cut Cylinder] onto the cylindrical shape. [2] Select the hole and activate the TriBall. [3] Use the ...Create a Cam Belts
This section explains the basic operations of [Cam Belt] in the [Flex Shapes] catalog. Procedure: Expand [Cam Belt] in the Scene Browser. Change size You can change the size of the cam belt by moving the negative feature cylinder (H Cylinder) using ...