Creating Quick Coordinate Dimensions
This section explains the Quick Coordinate Dimension feature.
Procedure:
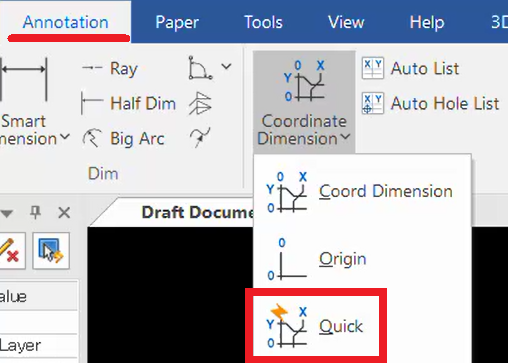
[1] Click [Quick] under the [Coordinate Dimension] menu in the [Annotation] tab.
[2] First, click the point to be defined as the origin (base point).

[3] Click any point where you want to display the X and Y coordinate dimension values.
Right-click or press the [Enter] key to open the [Dimension Properties(note to check contents correctly)] window.
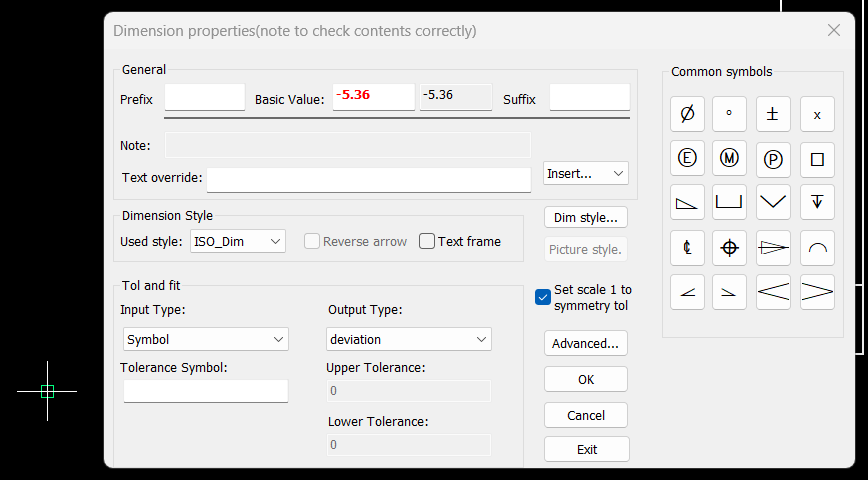
[4] To switch between X and Y coordinates, use item 3 ([X Coordinate] / [Y Coordinate]) in the Instance Menu.

[5] After creating coordinate dimensions, press the [ESC] key to exit the command.
If you have the properties window open by right-clicking, clicking [Exit] will also exit the command.
If you click [Exit], dimensions shown as reference values will not be created.
To move the placed coordinate dimensions, you can change their position without changing the "Extension Line Length" by operating in Orthogonal Mode (F8) or while holding the [Shift] key.
When [Quick Coordinate Dimension] is selected, the Instance Menu appears at the bottom left of the screen.
(In the image, it is shown split, but in actual use, it appears in a single horizontal row.)
Explanation of the Instance Menu
1. With Sign / Without Sign
The direction to the right or upward from the base is positive (+), and to the left or downward is negative (–).
To add a minus (–) sign for dimensions in the negative direction, set to [With Sign].
To omit the minus sign, set to [Without Sign].
2. Show Origin / Hide Origin
When Show Origin is selected, a point is displayed at the origin as shown below.
3. X Coordinate / Y Coordinate
Switch between X and Y coordinates for dimension creation.
4. Extension Line Length
Sets the length of the dimension extension line.
The actual length is: extension length + text length.
5. Prefix
The symbol or character entered as a prefix appears before the dimension.
6. Suffix
The symbol or character entered as a suffix appears after the dimension.
7. Base Value
To change the measured dimension value to a desired value, directly enter it in this field.
The default displayed value is the [Calculated Value], which is the measured value.
You can enter a value even during dimension creation.
The first base value is 0, but if you want to change the second measured value to a desired value, enter it before confirming the measurement point of the second dimension.
Related Articles
Create Progressive Dimensions (Coordinate Dimension)
In CAXA Draft, progressive dimension is referred to as [Coordinate Dimension]. To create dimensions based on any arbitrary reference point in the drawing, use [Align] in the [Coordinate Dimensions]. When you select [Align], the instance menu will ...Creating Hole Coordinate Dimensions
This section explains how to create hole coordinate dimensions. [Hole] of coordinate dimensions display the X and Y coordinate values of holes in a projected view from an arbitrary reference point. You can also select points on shapes, not just ...Creating Free Coordinate Dimensions
This section explains how to create free coordinate dimensions. Define the starting point and fill in the coordinate dimensions while selecting the X and Y coordinates. You define a starting point and input coordinate dimension values by selecting X ...Create dimensions in parallel for angled parts
Introduce how to create dimensions in parallel for an angled part. In case of "Base" command [1] Select "Base" from Smart Dimension pull-down menu on the "Annotation" tab. [2] Select a line from draw, then an endpoint (intersection) or line. By both ...Create dimensions with the "Hole Dimension" command
Explain how to create dimensions with the "Hole Dimension" on the "3D Interface" tab. The Hole Dimension command displays dimensions on holes projected onto CAXA Draft based on hole information created with 3D data. Examples of projections linked to ...