Create a pull spring
This section explains how to create a tension spring.
When using the Parasolid modeling kernel, it is not possible to create a tension spring without any gaps.
A slight gap is required.
Also, when placing a helix in space, the anchor point of the part is not created at the center of the helix.
You will need to use some tricks, such as temporarily placing a reference part.
Procedure:
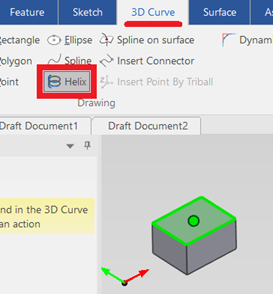
[1] Place a "Block" as a reference part so that the anchor of the spring is created at the center.
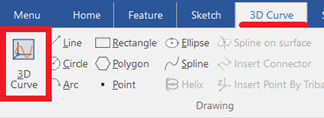
[2] Click [3D Curve] on the [3D Curve] tab.
[3] Click [Helix] on the [3D Curve] tab and place it on the reference part.
[4] Enter the parameters and click [OK].
Then, click [OK] again to exit the [3D Curve] editing mode.
[5] Go to the [Feature] tab → [Feature] group → click [Sweep Wizard].
When you select the created [Helix], it will switch to creating the cross-sectional shape.
[6] in the [Sketch] tab → Drawing Group → click [Center Radius], then create a circle.
Set the diameter of the cross-sectional shape smaller than the [Helix Pitch] to allow for a gap.
In this example, the start pitch [p1] is [20], so the helix pitch becomes 20/2 = 10.
Therefore, set a value smaller than [10].
[7] Suppress or delete the block and 3D curve used as references.
Please refer to the video below.
IC-028
Related Articles
Create actions that the spring stretches
Explain how to create an animation of spring (spring) telescopic. This section explains how to create an animation of a spring (coil) extending and compressing. You can represent the spring’s motion by creating its shape using Sweep, and applying ...Set Insert Joint Point and create continuous pipes and mounts
This section explains how to use the [Attachment Point] function to build continuous pipe structures or equipment base frames in IRONCAD. In piping design and equipment base structures, it is common to use multiple sections of the same type of round ...Create Revision Symbol
This guide explains how to create revision symbols in CAXA Draft. You will overlay a triangle shape and a number, combine them into a block, and then register it in the parts library. Procedure: [1] Go to the [Common] tab → select [Polygon] to create ...Creating a Block (CAXA Draft)
This section explains how to create Block parts in CAXA Draft. Block parts allow you to register frequently used lines or shapes as blocks so that they can be easily inserted into drawings. By registering items such as bolts, pins, and annotations as ...Create Movement Using [Walk] Feature
This section explains how to create a movement that simulates walk a building from the camera's point of view. Two cameras are required: the main camera and a viewpoint camera (walkthrough camera). When executing the animation, make sure the ...