Insert special symbols directly
Explain how to add special symbols such as Φ, °(degree), X(vs), ±(plus and minus) to the dimensions you created.
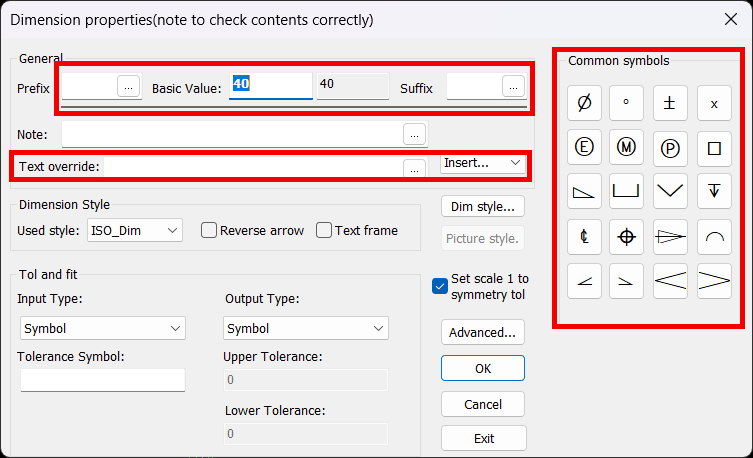
[1] To insert a special symbol directly, double-click the dimensions to move the cursor to the entry on the Properties dialog.
(Dimension properties [Text override] etc.)
(Dimension properties [Text override] etc.)
[2] Click the target symbol from the [Common Symbols] list on the right side of the dialog.
[3] If you want to use another symbol, insert ...Choose from and use it.
CA-035
[4] Direct hand entry is also possible.
Enter %c, %d, %x, and %p directly to convert the code.
%c=Φ, %d=°, %x=X, %p=±
2-, 2x, depth, penetrate, penetrate, pass, (square), etc. Please enter the number and depth, any symbols and characters directly.
%c=Φ, %d=°, %x=X, %p=±
2-, 2x, depth, penetrate, penetrate, pass, (square), etc. Please enter the number and depth, any symbols and characters directly.
Related Articles
Create tape dimensions/curvature radius dimensions/large diameter circular dimensions/continuous angle dimensions
The CAXA Draft drawing explains how to create the following special dimensions: Pyramid/Pitch Curvature Dimension Big Arc Angle Continuous Please refer to the video below. CA-033Create Progressive Dimensions (Coordinate Dimension)
In CAXA Draft, progressive dimension is referred to as [Coordinate Dimension]. To create dimensions based on any arbitrary reference point in the drawing, use [Align] in the [Coordinate Dimensions]. When you select [Align], the instance menu will ...Create a fan model
Fan-shaped models can be created in the Spin Wizard or Extrusion Wizard. In case of Spin Wizard [1] Click "Spin Wizard" on the Feature tab. [2] Select Plane Type, then draw sketch. Create a sketch with the Y axis pointing upward. Then click "Finish" ...Adding Auxiliary Surface Symbols to Welding Symbols
This section explains how to add auxiliary surface symbols to welding symbols in CAXA Draft. Procedure: [1] Click [Welding Symbol] in the [Annotation] tab. [2] Configure the Groove Symbol. By default, it is set to [None]. Select the desired symbol ...Create continuous angle dimensions
This section explains how to create [Angle Continuous] dimensions. As shown in the figure below, you can create dimensions for a series of continuous angles in a single operation on a plan view or similar drawing. Please refer to the video below. ...