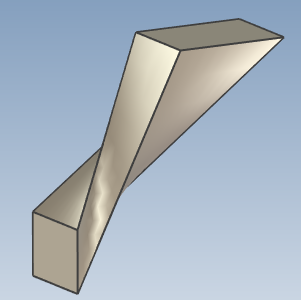
Fix the twist of the shape created with loft
When creating a shape using the Loft function, the resulting geometry may occasionally become twisted.
This section explains the procedure to resolve such twisting issues.
Procesure:
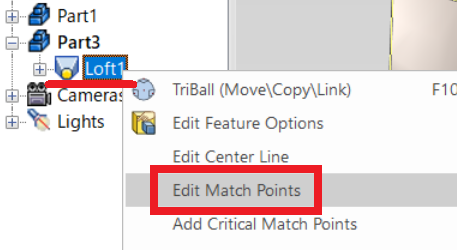
[1] Right-click of Loft. Click [Edit Match Points].
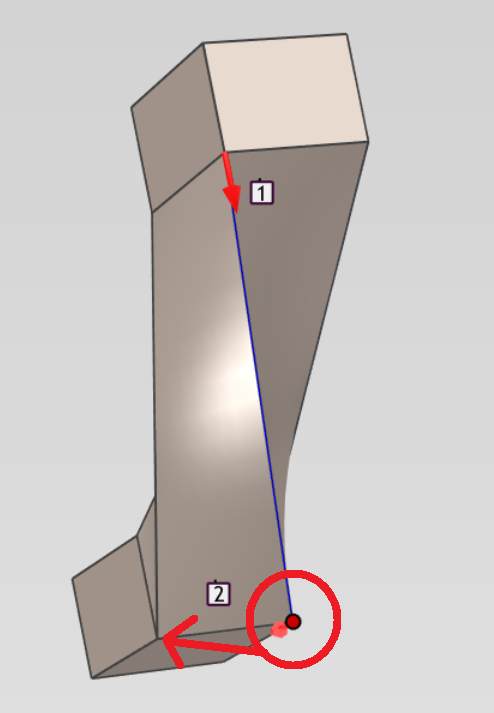
[2] Click on a number to see a red dot. (Match Point)
[2] Click on a number to see a red dot. (Match Point)
Drag and drop to fix the position.
[3] The twisting is eliminated and the shape becomes normal.

Please refer to the video below.
IC-141
Related Articles
Remove Material Using Lofted Shape (Loft Remove)
This section explains how to remove part of a solid using sketch profiles of different sizes or shapes on the top and bottom surfaces. You can delete from shape that connects two sketch profiles using the [Loft] feature. For IronCAD 2023 and later ...Create a twisted shape
This section explains how to create a twisted shape using [Loft] in the [Feature] tab. Procedure: [1] Create Sketch. then copy at the "TriBall". And set position each sketch. [2] Click [Loft] in the [Feature] tab. [3] Select all sketches. [4] Click ...Creating a Closed Loft Surface
This section explains how to create a closed loft surface. Procedure: [1] Create straight lines using sketches or 3D curves. Arrange them to form a triangle or circle when viewed from the side. If the section shape is even slightly complex, a closed ...Move the position of the 2D shape drawn by sketching
When creating 3D shapes, you may need to create 2D sketch geometry. Sketch shapes can be drawn freely, and there may be cases where you move the drawn geometry. There are three methods for moving sketch geometry, as described below: Select the sketch ...Setting Loft Continuity: [Start Magnitude / End Magnitude]
When adding a loft to the edges of an existing surface or solid, you can set the continuity using Start Magnitude and End Magnitude. Procedure: [1] Prepare the existing loft shape. [2] On the Surface tab, click [Loft Surface]. When creating an ...