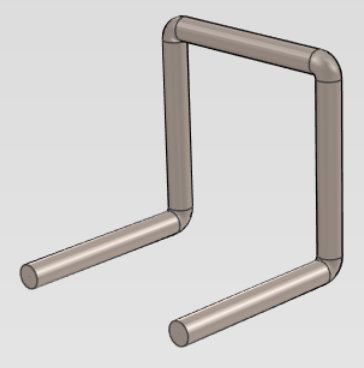
Create a round bar with a 3D curve (create a curved round bar)
After creating lines with "3D Curve", it will explain how to create a round stick with "Sweep".
 The following actions are based on IRONCAD 2022 and later versions:
Prior to IRONCAD 2021, the command placement is different, but the operation method is the same
Example: Straight Line
[1] Click [3D Curve] of [Drawing] Group of [3D Curve] tab.
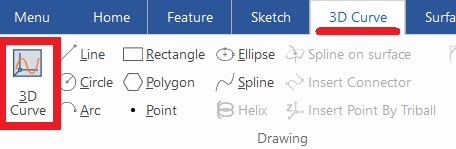
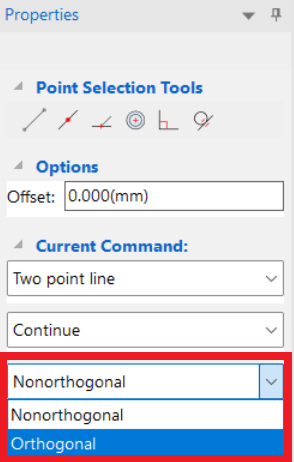
[2] Click [Line] and select [Orthogonal] in Properties.
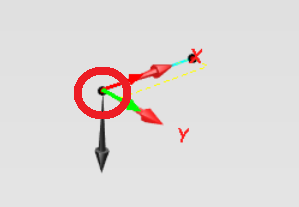
[3] Click on the coordinate system to specify the starting position.
[4] You can change the direction to draw the line with pressing the Tab key.
[5] Move the cursor in the direction to draw the line and enter the length with the Enter key.
※Pressing the left-click determines the length at that location.

※Pressing the left-click determines the length at that location.
[6] Specify the direction and length, and create 3D curves continuously.
After creating, click [OK].
After creating, click [OK].
[7] Click the Feature tab → Feature Group → Sweep Wizard.
[8] Click on the starting point of the 3D curve and create a cross-sectional shape.
[9] Create any closed shape with the "Drawing" commands on the "Sketch" tab.
[10] Click [Finish] and completed.

Please refer to the video below.
When you draw a 3D curve, the coordinate mark will be displayed in the scene, but if you start from any position, a new coordinate mark will be displayed at the clicked position.
Related Articles
Set Insert Joint Point and create continuous pipes and mounts
This section explains how to use the [Attachment Point] function to build continuous pipe structures or equipment base frames in IRONCAD. In piping design and equipment base structures, it is common to use multiple sections of the same type of round ...Create a Bent Round Pipe (Rod) Shape
This section explains how to create the shape of a bent round pipe or round rod. Procedure: [1] Click [Sweep Wizard] in the [Feature] tab. Click [Finish]. [2] Create the guideline for the pipe using sketch commands. Click [Finish]. [3] Create a ...Creat a Helical Groove on a Cylinder
This section explains how to create a helical groove on the side of a cylinder using the [Helix] option under 3D Curve. The helical groove is created using a combination of the [Helix] command from 3D Curve and the [Sweep] command. Procedure: [1] ...Create Broken View
Procedures: [1] Click "Broken View" and select the projection view you want to create. [2] Select the type from item 1 of the status bar. zigzag/curve/line [3] Specify on two ranges to omit (start and end). ※Several can be created [4] Right-click to ...Creating a Sheet Metal Part Using [Curved Stock]
This section explains how to create sheet metal using [Curved Stock]. Procedure: [1] Drag and drop [Curved Stock] from the [Sheet Metal] catalog. [2] In the [Select Stock] window, choose a stock and click [OK]. The visibility of this window can be ...