Register in the parts library
By defining shapes created by CAXA Draft into Part Library, it can be inserted into other drawings and reused.
Procedure:
[1] Click [Define] on the [Insert] tab.
[2] Select the shape.
After right-click or enter to complete the selection.
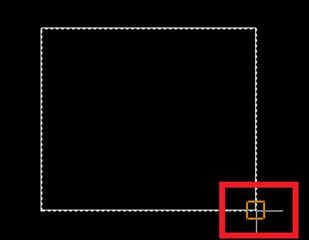
[3] Select the "view base point" of the shape.
After right-click to complete.
[4] After entering ”Class” and ”Symbol Name”, click "Finish" to define.

[5] When inserting a defined part, click [Insert] on the [Insert] tab.
For more information, please refer to the video below.
CA-002
Related Articles
Creating a Block (CAXA Draft)
This section explains how to create Block parts in CAXA Draft. Block parts allow you to register frequently used lines or shapes as blocks so that they can be easily inserted into drawings. By registering items such as bolts, pins, and annotations as ...Create deployment parts from solid/surface
This section explains how to convert parts imported from intermediate files (without edit history) or parts created using the [Shape] catalog in IRONCAD into flattened parts. Flattened parts can be projected into CAXA Draft for drawing creation. Use ...Multiple parts into one part (Boolean - Union)
Explain how to make multiple parts into one part. Procedures: [1] Click [Boolean] on the [Feature] tab. [2] Select [Union] from the [Properties]. [3] Select multiple parts to change one part with left mouse click. The selected parts are added to the ...Create Revision Symbol
This guide explains how to create revision symbols in CAXA Draft. You will overlay a triangle shape and a number, combine them into a block, and then register it in the parts library. Procedure: [1] Go to the [Common] tab → select [Polygon] to create ...Set Parts as Active
When setting a part as active means currently modeled part only editable. This prevents accidental modifications to other parts. How to: Select the part you want to activate, then right-click and choose [Set as active] from the context menu. The name ...